Please note: every video below is also on Padlet.
Monday (16/02/26):
At first, we were introduced to the Lip Sync elective by Jess. The aim of the elective is to ‘breakdown’ a recorded dialogue, then design characters, background and a scenario based on the audio (the characters can be anything, but they a mouth and lips). This will then be animated and in-betweened using the 12 principles of animation, with lip-syncing being at the end once everything has been completed.
This is the breakdown of what we’ll be learning by the end:
- Moodboard
- Transcript and sound breakdown
- Narrative structure
- Storyboard and Animatic
- Character designs
- Background designs
- X-Sheets and Mouth Shape Sheets
- 12 Principles of Animation
- Colour Theory
- Animating, In-Betweening and Lip syncing using Toon Boom Harmony
- Compositing with After Effects.
This was the criteria for our audio:
- Must be 10-15 seconds long
- Must not contain any derogatory language (swearing is fine to an extent)
- Must be self-recorded, cannot be scripted and cannot record fellow animation students or staff.
END OF THE ELECTIVE: Moodboard, storyboard, X-Sheet, character & environment designs, 10-15 sec animation and a written reflection (300-500 words).
We then wrote about our aims for this elective, and I wrote the following:
“I want to plan an animation extensively without accidentally skipping over steps, and I aspire to draw two simple yet expressive characters in front of a drawn background. I also want to work on attaining a consistent artstyle when animating.”
Our task for today was to create a moodboard of our impressions of London before making our audio. As a result, the brief was slightly abstract for me to follow, especially considering London is a bustling city that invokes a plethora of emotions, none of which are consistent enough to be in a moodboard. But I persisted, and the first thing I thought of was the London parks, and also badgers for some reason (probably due to their significance in stories about the woodland animals of Britain).
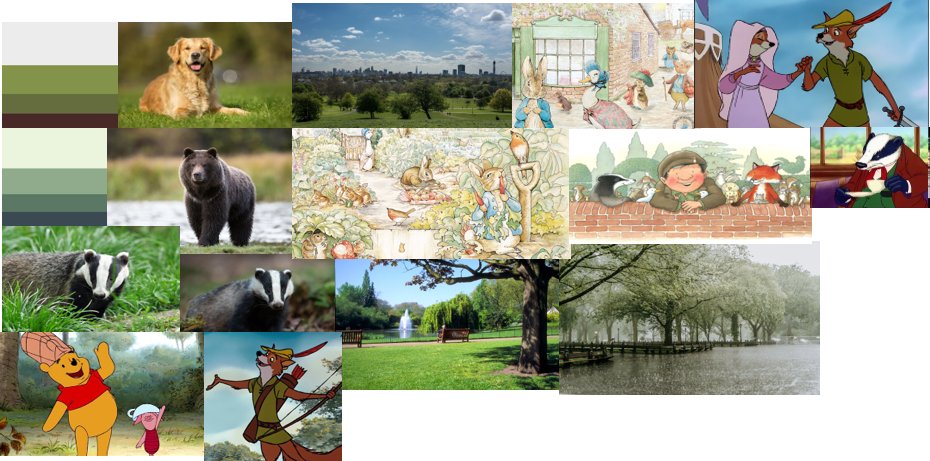
Unfinished moodboard of my ideas.
For some reason, I thought it would be wise to brainstorm animation ideas based on my moodboard before getting the audio. But after discussing it with Jess, I realised I was getting too ahead of myself and needed to wait until I had my audio before planning anything.
We needed our 10-15 second audio by Wednesday, so I originally thought of asking my parents about their respective experiences moving to London back in 2003, and how much London has changed since then. However, I stuck with a different idea, which was to ask my schoolfriends about their own experiences over video call. The questions I had planned were:
- What’s your impression of London?
- What’s your favourite place in/part of London?
- What has been your craziest experience in London?
- How do you feel commuting to London?
- What don’t you like about London?
- 3 things that come to mind when you think about London and why?
One of my friends couldn’t attend the call, but I was able to talk to my other friend, and on Tuesday we spoke about London for 40 minutes. From this, I got a snippet of audio that I felt was extremely suitable for this project:
Wednesday (18/02/26):
On Wednesday, we had to present our audios. Using CapCut, I prolonged the pauses as I felt they were too short, so the audio ended up being almost 15 seconds.
We learned about different types of narrative structures, which included learning about structures such as linear and fractured, and types of conflict like Man vs Man and Man vs Society. We also learned about narrative building, and how to create a plot using a platform and a tilt. The platform is the foundation for the story, and enables us to answer questions about each character and what they’re doing + how they’re feeling. The tilt is the unexpected change that often occurs in a story.
Afterwards, we learned about beat-sheets, which are a list of key plot points (beats) that drive the narrative and will be used to help visualise our storyboards. We then had 10 minutes to identify the beats in our audio, which startled me as I didn’t have any ideas ton begin with, and was hoping to get more time to think about it. Jess also suggested that we do quick “sprints”, AKA write as many ideas as possible with a timed limit, thinking about questions like:
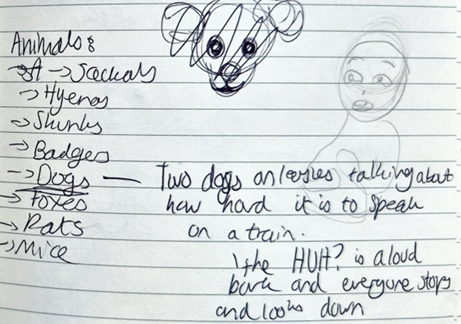
- Which animals come to mind? (I wanted to animate animals rather than humans, I didn’t feel comfortable animating the latter at the time)
- Which settings come to mind?
- Which premise comes to mind? etc.
The outcome of the quick sprints are shown below:
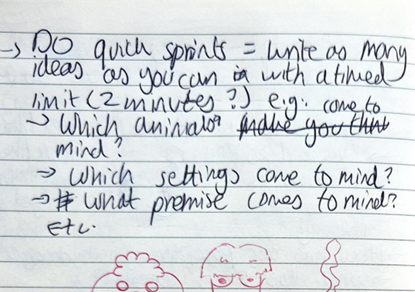
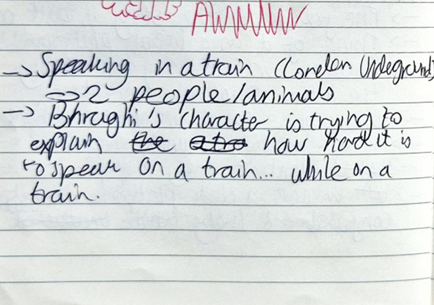
This helped me brainstorm ideas clearer, and through this I formulated a platform idea.
- Platform: Two dogs on a train, one of the dogs is ranting about how they can’t hear anything on the train because it’s so loud.
- Tilt: The dog recounts her reaction to not being able to hear being like “HUH?!” and she shouts so loud, everyone turns to stare at the dogs.
Lastly, we learned about storyboards and composition, with most of the content recapping what we learned in the Animatics rotation in Autumn. For Friday, we had to complete our beat-sheet and create a storyboard from it. I was dreading making a storyboard as I’m not good at it, and I usually go straight to making an animatic.
When I got home, I made the beat-sheet, which took a while as I wasn’t sure what to add. To help, I used myself as reference and thought of ways to make the character acting as expressive and realistic (as realistic as a dog speaking can be) as possible, and wrote down each of Yappie’s actions as a beat.
- YAPPIE sits comfortably on her owner’s lap. Her tail wags (consistent throughout animation)
- YAPPIE opens her mouth. (“You know when the”)
- YAPPIE leans forward and lift her paw up, then looks up (“Trains like”)
- YAPPIE rises on her hind legs and lifts both paws up (“Screech like”)
- YAPPIE flaps her paws while swaying back and forth (“F*cking pterodactyls”)
- YAPPIE sits back down (her tail wags slower, as if unsure). She turns head to the other side, scrunching her paw up in a thinking pose (“Like…”)
- YAPPIE’s eyes dart to SCHNORKLE, and a smile slowly blooms on her face.
- YAPPIE turns back (ears flap as she moves) and she points at SCHNORKLE (“So you can”)
- YAPPIE stamps her paw down and partially stretches towards SCHNORKLE (“Barely”)
- YAPPIE fully stretches, basically in SCHNORKLE’s face at this point with her paws still firmly planted in her owner’s lap, and her eye twitches. (“HEAR”)
- YAPPIE moves back (“You’re like”)
- YAPPIE’s head tilts up and she barks, wearing a comical, derpy expression (“HUH?!”)
- YAPPIE points at SCHNORKLE (same frame as 8) (“So”)
- YAPPIE pushes up into her owner’s arm (“You just”)
- YAPPIE nods with the same expression as in 12 (“Nod”)
- YAPPIE nods normally (“And you’re like nodding, and you don’t understand a thing your”)
- YAPPIE gets pushed down by her owner, and looks annoyed at the action (“Friend says when they’re”)
- YAPPIE glances at her owner before smiling and continuing with her conversation (“Talking to you.”)
However, I didn’t make the storyboard for Friday as I was unable to visualise anything without knowing what the character designs looked like.
Friday (20/02/26):
We learned about character design during this lesson, although most of what was taught was a recap of elements from Breaking Character. However, the activity was different, and we had to design to apply our knowledge of shape and structure. We then had to create character and expression sheets out of design characters out of inanimate objects . I found this activity challenging and was unable to visualise characters in such little time, and felt I didn’t execute their designs the way I wanted to.
Afterwards, we were given examples of other artists’ work in regards to what the aesthetics of our respective animations could be. I really liked Beatrice Blue and Tonko House’s work as at the time I believed they fit the best with my aims for the project aesthetic-wise.
We then learned how to create a construction sheet, and for our homework, we needed to come up with designs for our characters and create construction sheets and character turnarounds for them.
When I got home, I immediately started devising initial designs for both characters. Inspired by the quick sprints exercise, I implemented it into the designs to help me brainstorm their appearances. I intended to push the boundaries of my creations, and everytime I’d draw something I’d then devise components to exaggerate. The artstyle was intended to be reminiscent of Disney and Golden Age Cartoons, but also of dog memes I frequently find on Pinterest. Since I wanted both characters to be lapdogs, I came up with a variety of breeds that could fit them respectively. I ended up choosing dachshund and pug, and decided each dog would have completely contrasting personalities in accordance with the “Unstoppable Force vs Immovable Object” theory. This was also heavily inspired by my own dogs, who are both polar opposites. In this case, the dachshund is the character speaking, and I chose this breed not due to its personality but because of its appearance. I felt it would have enough energy and squash + stretch to emulate the energetic nature of the character. Its long body could easily be contorted and elongated like a slinky to show how bouncy the dog is and how it is unable to stay still. Its temperament did help solidify my breed of choice, as dachshunds are known to be vocal and full of energy.
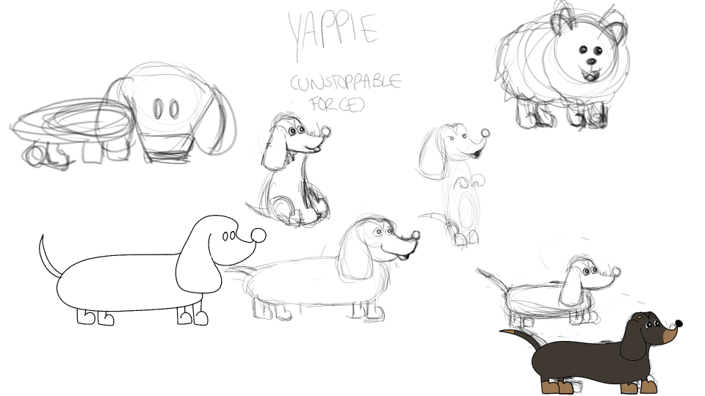
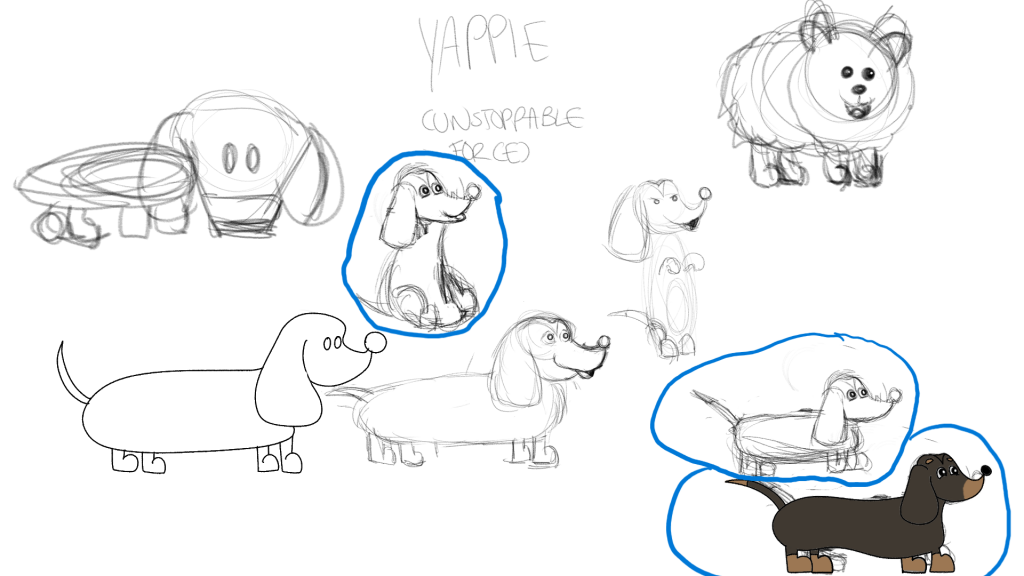
“Yappie’s” original designs. The drawings circled are what I decided on using in the animatic (until I changed my mind during the production process).
On the other hand, I chose a pug for the lazier character as I have always perceived them as such (despite their personalities actually being more akin to dachshunds), and often see them as companions for older people. Moreover, pugs seem to have limited mobility, and I really wanted to outwardly contrast the 2 dogs to make their dynamic more interesting. I worked on the pug’s design before the dachshund’s as I had a better idea of what the former would look like.
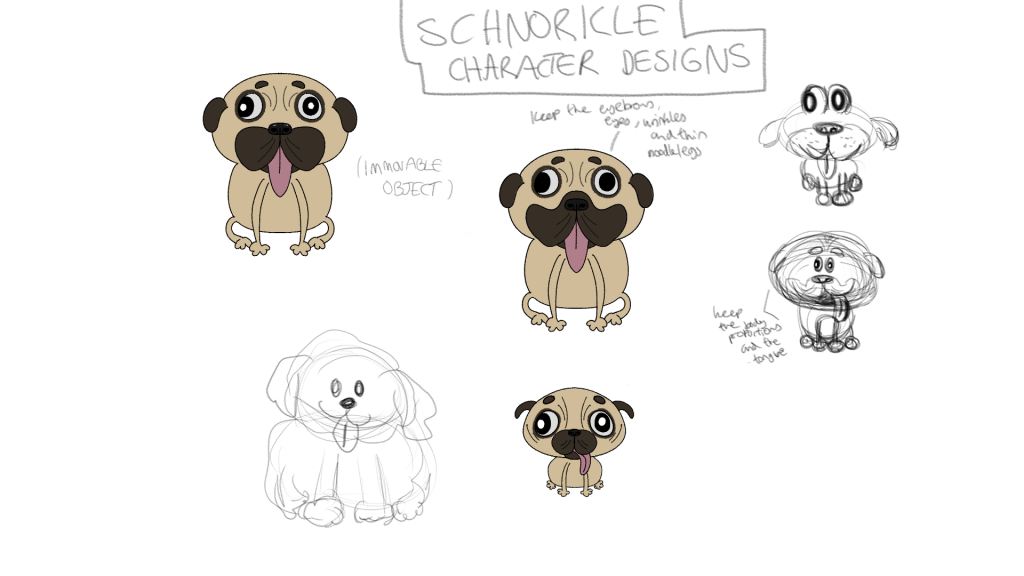
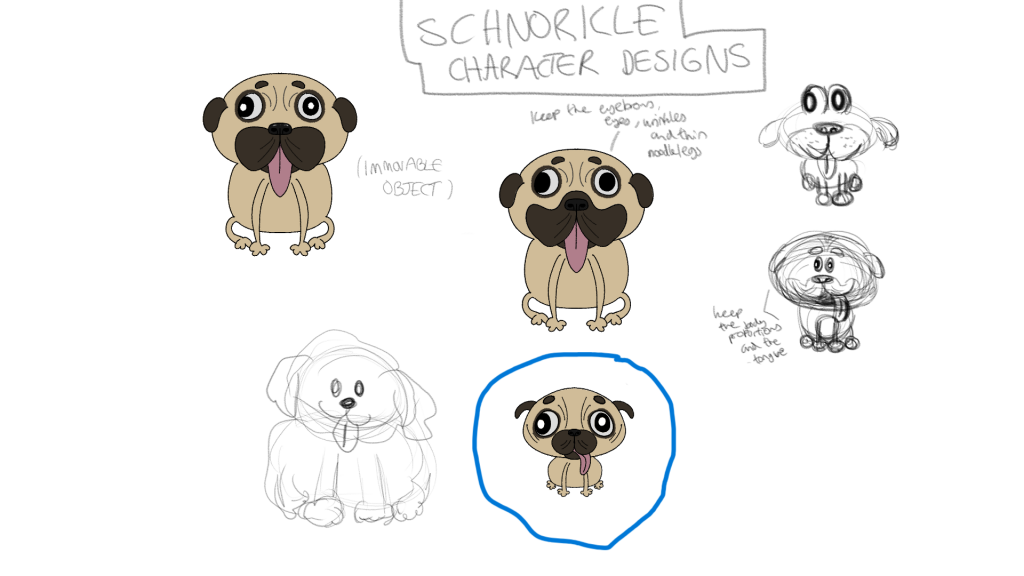
“Schnorkle’s” original designs. The drawing circled is what I decided on.
From the initial designs, I made the storyboard in Clip Studio Paint (see Storyboard in PDF) and then got started on my animatic. I didn’t stick close to the designs when storyboarding or animating, instead making everything as rough as possible because I didn’t want to spend most of my time on it. This was the first draft of my animatic (taken directly from the storyboard with more frames added in between):
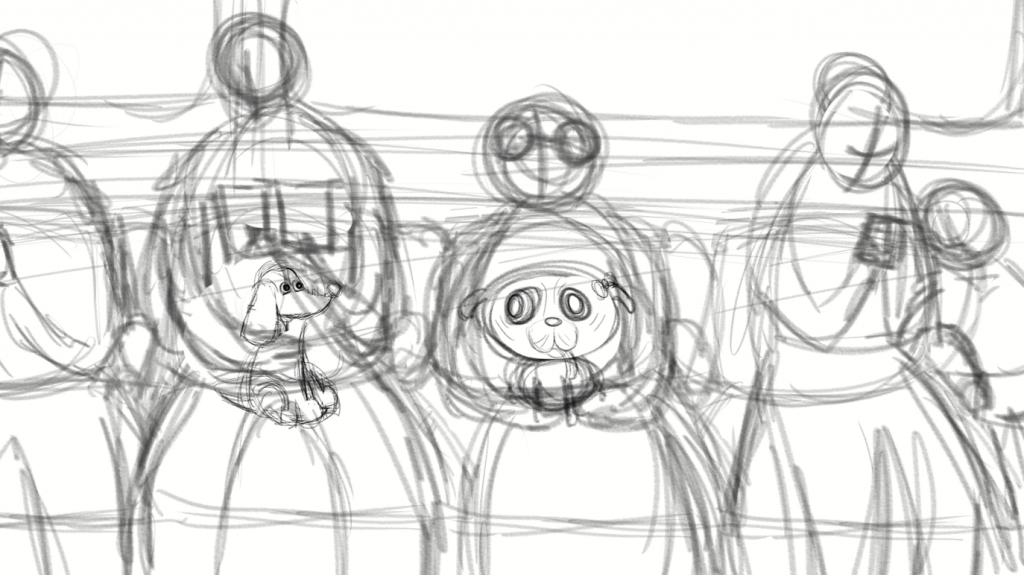
Animatic first draft. Click the photo above to be redirected to Padlet.
This was the moodboard I created from the plot idea and character designs:
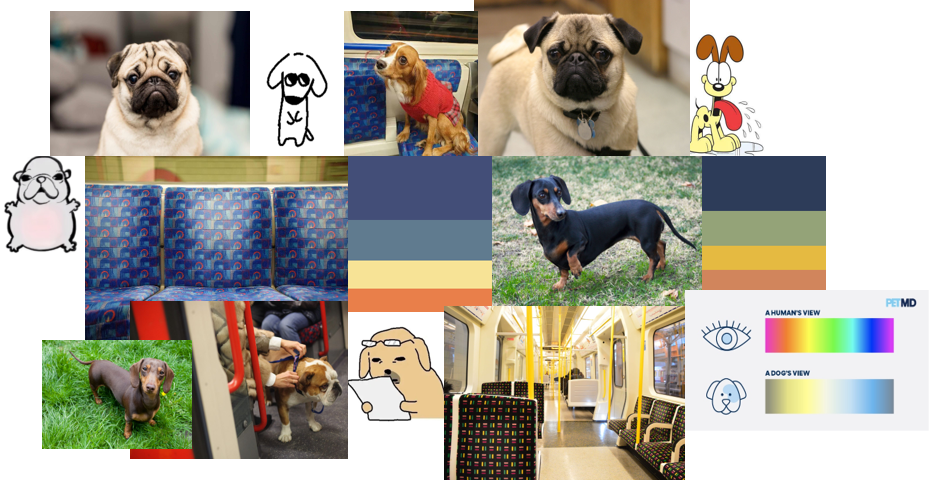
New moodboard after obtaining audio.
Leave a Reply